System Notifications
The application page that displays System Notifications to users is not currently implemented. Therefore, any notifications you create cannot be displayed.
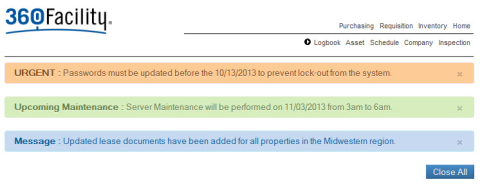
The System Notifications page allows you to set up notification messages that appear on every user's screen when he logs in. System notification messages appear at the top of the page and are color-coded— urgent notifications are orange; maintenance notifications are green, and messages are blue.
System Notification messages remain on the user's screen until they expire or until the user closes them.
To open the System Notifications page:
-
Open the Administration Menu page.
-
Under the SYSTEM ADMINISTRATION heading, click System Notifications.
The System Notification Admin page displays all existing notifications. You can sort them by clicking a column heading.
Adding a system notification allows you to define a new message that will appear, system-wide, to all users when they sign in. To create a new system notification:
-
Click the Add New link.
The Add System dialog box opens, allowing you to create a new notification.
-
In the Notification field, enter the text that you want the user to see.
-
Using the Start Date fields, select the date and time when you want the notification to first appear.
-
Using the End Date fields, select the date and time when you want the notification to expire.
-
In the Type field, select the type of message.
You can select Urgent, Message, or Upcoming Maintenance. Each type of message is displayed in a different color.
-
In the Tab Order field, enter a numeric value.
The Tab Order indicates the position, on the screen, where this notification will be displayed. Lower numbered values are displayed toward the top of the list. Notifications with the same tab order are displayed in the order in which they were entered into the system.
-
In the Active field, select Yes to make the notification active.
Inactive notifications are permanently removed from the list. Therefore, making a notification Inactive is the same as deleting the notification.
-
Click ADD.
The notification is added to the list and will be displayed at the Start date and time. The notification parameters are displayed, including the name of the user who added the notification and the date and time it was added.
System notifications can be modified. For example, if you want to display the notification for a longer period of time, you can modify the end date. To edit a notification:
-
Click the Edit link to the right of the notification you want to edit.
The Edit System Notification dialog box opens.
-
Modify any of the following values:
- Notification – the value that will be seen by the user
- Start Date – the date and time when the notification will first appear to users
- End Date – the date and time when the notification will expire
- Type – the type of notification, Urgent, Message, or Upcoming Maintenance
- Tab Order – the order in which the message will be displayed
- Active – Yes indicates that the notification is active (displayed to the user)
Making a notification Inactive removes it permanently from the list.
-
Click UPDATE.